|
.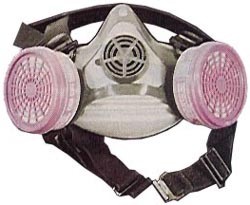
A charcoal filtered respirator
Now that I have persuaded you to paint your own airplane where
do you begin? You will need some sort of paint facility, good painting
equipment, and the knowledge necessary to prepare and paint the airplane. I will
discuss all of these in this and the next article. I will discuss what type of
facility is needed, spraying equipment, how to prepare surfaces for paint, and
the actual process of painting.
When should you paint your airplane assembled or prior to
assembly? A first time painter will be better served to paint the airplane prior
to assembly. It is much simpler to paint the individual parts of an airplane
rather than to paint the entire airplane at one time. However, most of our
airplanes are smaller in size so painting the completed airplane is not as
difficult as painting a large assembled aircraft. In either case there are ways
to accomplish a quality finish that will be discussed later. Some builders will
want to wait until they have test flown the airplane prior to painting. That
enables them to correct problems and make necessary changes resulting from the
test flying period. Some of these changes could affect the finish of the
aircraft so they will wait until this time for final painting. Again, if you
possibly can, paint the airplane prior to assembly. Painting an airplane is
literally 90% preparation and 10% painting. Be ready to spend most of your time
preparing surfaces for painting. The actual spraying process consumes a small
amount of time. Remember also to practice-practice-practice. Before you begin
applying the topcoats you will have acquired experience spraying primers.
Obviously, the primer coat does not show so if spraying mistakes are made they
can be easily corrected. You can also practice spraying techniques on large
pieces of cardboard, old doors, masonite, stove pipe, etc.. If you are painting
a fabric covered airplane you will have literally hours of practice spraying the
more viscous coats of chemicals used on fabric. Then when you are ready to spray
the final colour coats you can do so with confidence. The bottom line is this
painting an airplane is usually approached with much more fear than is
necessary. Whether or not you elect to paint your entire airplane you certainly
will end up painting a number of small parts. Consider painting the airplane
yourself. You can do it!
facilities for
painting
Ideally you would have a clean, well lit, temperature
controlled paint shop. Realistically, you will probably have to paint in your
garage. Some builders are fortunate enough to locate a hangar or other such
facility for their painting. Bear in mind that some airports will no longer
allow painting unless the shop is designed and built to comply with local
restrictions. Certain locations require the user of solvent based paints to
filter overspray and have a method of collecting waste. If you are using a water
based paint you will not be faced with this problem.
You do not want to use your basement for painting. The fumes
will permeate the entire house and you will not be popular with your family. A
garage or workshop is adequate. After you have found a suitable location for
painting the next step is to build a poor man's paint booth. This can be done
very easily by using PVC pipe and plastic sheets. Build a square frame out of
wood or PVC pipe large enough to cover your airplane or the largest surface you
will be spraying. You should allow enough space to be able to walk around the
surface. You can hang the frame from your ceiling with pulleys so you can raise
and lower it. Cover the roof and sides with plastic sheeting stapled or taped to
the frame. Tape the sheets together using duct tape. At one end of the booth
place a furnace filter and at the other end an exhaust fan. This will provide
filtered air. Make sure the fan has an enclosed motor with no chance of
sparking. If you are unsure about the fan, leave it out and quit spraying when
the booth becomes full of overspray. The overspray will settle in minutes and
then you can go back to work.
Lighting is of utmost importance. Your booth should have an
abundance of lights on moveable light stands or any other way you can arrange
them. Shield the bulbs with chicken wire to prevent breaking which could ignite
paint particles. When you are painting you cannot have too much light. You will
also want to hang small pieces of your airplane for spraying. This can be
accomplished by using welding rod hooked over a length of pipe. Then attach the
small pieces to the welding rod. The length of pipe or wood can be suspended
from the top of the spray booth.
You do not want to paint in the following areas: (1) outside in
fog or high humidity, (2) outside in direct sunlight, (3) in the wind, (4) in a
dusty place, (5) in a rented or borrowed spray booth where you can't take your
time. You will usually not be able to paint when the temperature is below 60
degrees F. When you have finished painting you can throw away your paint booth
or donate it to a friend. It is important that you have a clean, well
ventilated, and well-lit area.
 painting
equipment painting
equipment
Do not try to save money on painting equipment. High quality
paint rigs produce high quality finishes. There are four basic methods of
applying paints. They are: (1) conventional pressure fed gun, (2) High-Volume,
Low-Pressure (HVLP) systems, (3) airless spraying, and (4) electrostatic
spraying. Airless spraying and electrostatic spraying are used primarily in
production work. Airless sprayers force paint through a small tip opening at
extremely high fluid pressures ( usually 1200 to 3600 psi ). Using this amount
of pressure affords airless sprayers the ability to spray almost any coating.
Because of the high pressures airless sprayers are rarely used in the aircraft
industry. Electrostatic spray systems charge the paint at the tip. A high
voltage difference is set up between the paint and the object to be painted. The
charge attracts the particles of paint and they wrap around the object. This
type of spraying is used in factory applications.
Conventional Spray
Systems
That leaves the custom aircraft builder with 2 choices of
spraying equipment, conventional pressure and HVLP. The conventional system uses
a high pressure source, usually an air compressor. The air compressor must be
capable of delivering about 40-50 psi at the spray gun. This means the
compressor must have adequate storage and be capable of supplying 90 psi+ at the
compressor outlet. These high pressures push paint out of the gun and mix it
with the airstream. Because the pressures are so high the paint is atomized
effectively so that it can be applied to the surface. High pressure guns have
been around for years. They can be used with large volume "pressure pots."
Pressure pots hold up to 5 gallons of material that is handy when applying
doping chemicals used on fabric airplanes. The spray guns used for smaller jobs
are usually suction fed. The same high pressure is used to atomize the paints.
The coating is held in a quart cup and it is drawn into the airstream by the
high pressure airflow creating a vacuum. If you are going to use the
pressure-fed gun or the suction gun buy a good brand. Make sure the cup has a
means of venting that will allow you to position it horizontally without
dripping paint on your surface. The nozzles used with paint guns are as
important as the gun itself. Certain nozzles are to be used with specific types
of coatings. You will need to purchase the proper nozzle recommended by the
manufacturer for the coating you will be spraying. If you choose the
conventional spraying method be absolutely sure you have moisture traps and
filters on your air compressor. Another point, if you are using a pressure pot
you must keep the hoses clean. If they are not properly cleaned particles of old
paint will be loosened and sprayed onto your project. A disadvantage of
traditional high pressure painting is the high velocity of the paint particles
as they reach the surface. Many of the paint particles will actually bounce off
the painted surface and gather in the air in the form of a cloud called
overspray. Often a large percentage of the paint itself (30-40%) which is used
ends up as overspray on the floor or drawn through the filter. At the price of
paint that can amount to a lot of money passing through a filter.
High Volume, Low Pressure
Systems
Because of the waste and overspray problem, a new technology
was introduced: High-volume, Low-pressure (HVLP). The pressure used in these
systems to atomize the paint is much lower (3-5psi). The paint cup is
pressurized forcing material to the nozzle. As a result, the overspray problem
is minimized. Most of the paint actually adheres to the surface being painted
instead of bouncing off and collecting elsewhere. To achieve this advantage a
HVLP spray gun must be machined to a higher degree than an ordinary spray gun.
The HVLP spray gun is designed to gather the air inside the gun and send it
downstream with as little pressure drop as possible. This means careful
machining must be carried out to reduce turbulence that impedes airflow. In
older pressure guns if a passage was too small you simply increased the pressure
and solved the problem. That means conventional spray guns do not have to be
machined to exact specifications.
Two types of HVLP spray systems are available. One is the
turbine system and the other is a conversion spray gun. A conversion spray gun
uses regular high pressure air and drops the pressure before it goes into the
gun. A conversion gun is simply a HVLP spray gun with a regulator in its handle.
This type of system requires a high capacity air compressor with moisture traps.
The HVLP type we will discuss is the "turbine system." An air compressor is not
used with the HVLP system. Instead, the system is equipped with a turbine not
unlike your vacuum cleaner. In fact, years ago Electrolux supplied a sprayer
attachment with their vacuum cleaner. Evidently that was the first HVLP system.
The turbine need only supply a large volume of air to the gun to work
effectively, high pressure is not necessary. All that is needed is an air source
that emits about 50 cubic feet per minute of air at less than 10 psi that is
sufficient to power the HVLP spray gun. A turbine is a high-speed centrifugal
blower motor operating near 20,000 RPM. Because of the high RPM the air is
heated due to the friction. This heat serves to eliminate all moisture from the
atomizing air. This heating effect also reduces the flash or drying time that
helps to minimize blushing. A HVLP system is sold with a turbine, hose, and
spray gun. The majority of the cost is found in the spray gun and not the
turbine due to the machining requirements of the gun discussed
earlier.
HVLP spray guns also are either non-bleeder or bleeder. The
term non-bleeder means that when the user releases the trigger of the gun the
air flow stops. With a bleeder gun the air flows continuously; the trigger only
starts and stops the flow of paint. A bleeder gun will provide a better finish.
However, use of a bleeder gun requires care because dirt and other objects can
be easily blown onto a painted surface.
Lets look at the advantages of the HVLP system. First of all,
the overspray is reduced dramatically. That means a saving in coatings typically
of about 30-40%. Secondly, an air compressor is not needed. The units come with
a 110 volt turbine that can be used anywhere. Thirdly, the moisture problem is
eliminated. One of the most significant problems a painter faces is the presence
of moisture that can splatter onto a surface along with the paint. The heating
of the turbine introduces heat that eliminates up to 95% of the moisture
content. Lastly, HVLP systems enable the beginning painter to achieve a
professional looking finish. They are easier to use than conventional spray
outfits. Individuals who have experience painting with conventional spray
outfits will have to learn the different techniques required to use HVLP
systems. HVLP systems expend heavier amounts of material than conventional guns.
This, of course, means different techniques. Remote paint pots with capacities
of 2.5 gallons are also available with these systems.
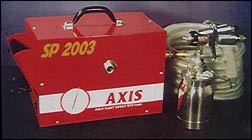
The Axis HVLP paint
system.
To conclude, HVLP paint systems have obvious advantages. Two
different brands are shown in the article. The price of these units is usually
between $700-$800. That includes the turbine, 30 feet of hose, and the spray
gun. You will also want to purchase additional nozzles for the spray gun
depending upon the type of paint you are spraying. Many people recommend an
additional length of hose that reduces the temperature of the air reaching the
spray gun. If you have a conventional system that is high quality then by all
means use it. Professional painters have been using conventional systems for
years with excellent results.
safety issues
Certain health hazards do exist with spray painting. Of course,
the hazards depend entirely upon the chemical that is being sprayed. The most
significant health hazard occurs when atomized chemical particles are inhaled.
You must protect yourself with an adequate respirator. A charcoal filtered
respirator, such as the one pictured, is sufficient for most primers, dopes, and
paints. However, if you are using any type of polyurethane paint you should have
a forced air breathing system. Polyurethane paints emit polyisocyanides that can
be extremely hazardous to certain individuals. Some people have severe reactions
to polyurethanes so don't take a chance. A simple forced air breathing system is
pictured and is manufactured by HobbyAir. It is available for less than $400. A
good investment to protect your health.
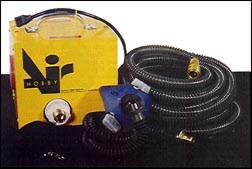
A forced
air breathing system available from HobbyAir.
You also need to protect your skin. Wear Invisible Gloves
barrier cream or latex gloves when mixing or spraying. I would also recommend
you purchase a Tyvek spraying suit. They are not very expensive and they will
protect both your skin and your clothes. If you do not use one of these suits
wear long sleeves and long pants. If you spill solvents on yourself, remove your
clothes and wash the area with soap and water and put on fresh clothes. Do not
mix paints with an electric drill. The motor could spark and cause a fire. Use
eye protection in the form of goggles when mixing and spraying. Keep an eye wash
station nearby in case of emergency. You should also have fire extinguishers
handy that are rated for petroleum fires. Under certain atmospheric conditions
the action of sanding or spraying can generate static electricity. When this
static charge is transferred to a surface the resulting spark could ignite
solvent vapors. Ground the structures being sanded or sprayed.
Now that we have determined that we can paint our own airplane,
we know what facilities are required, and we understand the equipment, our
discussion will be how to prepare different types of surfaces and followed by a
discussion of the actual spray painting process.
Painting an airplane to achieve an award winning finish can
present a challenge. In part 1 of this article, I discussed the fact that you
can paint an airplane yourself with quality results. The spraying equipment,
facility needed, and safety aspects were presented in that article. This part
deals with the preparation of surfaces and the basics of the painting
process.
As previously mentioned, preparation demands 90% of the time
involved in painting your own airplane. Proper treatment of the component parts
is both time consuming and essential. The most common surfaces encountered in
aircraft painting are aluminium, steel, wood, and fibreglass.
preparation of surfaces
Aluminium
Aluminium surfaces are treated differently depending upon
whether the metal is new or used. Paint must be able to "grip" or adhere to the
surface onto which it is applied. Most aluminium surfaces have a layer of pure
aluminium on the surface called alclad that protects the metal from corrosion. It
is very smooth and not favourable to paint adhesion. Therefore the surface must
be adequately prepared by cleaning and slightly roughening to guarantee primer
adhesion. This is accomplished by using a conversion coating such as alodine.
This chemical process creates a ceramic layer over the aluminium that coats the
surface and provides tooth adhesion. Used aluminium must have any primers,
paints, or corrosion removed. Paint strippers are used to remove old paint.
After stripping old paint the corrosion should be completely eliminated. Use
fine sandpaper, Scotch Brite pads, or aluminium wool. Never use steel wool or a
steel brush. After the corrosion is removed the old aluminium should be acid
etched. This is simply a process of washing the aluminium with a product such as
Poly Fiber's E-2310 Acid Etch diluted with water. An acid etch removes oil and
light corrosion while etching or roughening the surface to provide a firm primer
bond. The part is then thoroughly rinsed. Next wash the surface with E-2300
Conversion Coating that inhibits corrosion and further enhances primer adhesion.
After this step the part is rinsed and allowed to completely dry. Once again,
new aluminium surfaces need only be treated with a conversion coating.
After the aluminium (new or old) has been properly cleaned and
treated, it is then primed. I would recommend using a two-part epoxy primer. An
epoxy primer will insure corrosion protection and also provide a bonding surface
for most topcoat paints. Very often, polyurethane topcoats will lift or wrinkle
primers other than epoxies much as a paint stripper would do. A primer is
necessary to provide a bond between the metal and the final topcoat paint. The
primer coat should be applied according to the manufacturers directions.
Usually, two light coats will be applied. Heavy coats should be
avoided.
Steel
Steel surfaces are much more susceptible to corrosion problems
in the form of rust. This rust must be completely removed prior to priming the
part. Of course, any old paints or primers will usually be stripped. Certainly,
if you are going to paint over the existing topcoat you must still deal with any
rust that might be present. Removal of old paints can be accomplished with a
bead blaster or sand blaster. However, this must be done without pitting or
damaging the metal. Using the proper amount of pressure in blasting is
essential. Once the structure has been stripped and the rust eliminated, the
metal must be protected within 1-2 hours. Be sure to have the primer and spray
equipment ready before you begin blasting or cleaning. Rust will begin to form
on a bare steel surface within a very short period of time. Just as with
aluminium, after cleaning the structure prime it using an epoxy primer. Be sure
to clean the surface with a surface cleaner just prior to priming.
Wood
Wooden surfaces are usually covered with fabric. They still
must be properly prepared to prevent rotting problems from moisture. Usually the
part will be dry sanded and then varnished using a two-part epoxy varnish.
Solvents used in fabric covering systems will "lift" most varnishes other than
epoxies. If you plan to paint directly over the wood itself, an epoxy varnish
must be used.
Fiberglas
Fiberglas parts should be sanded smooth and primed using an
epoxy primer. Of course, if you are building a composite airplane the surfaces
must be filled and primed in the manner discussed in a previous article on
composite construction.
As a general review, all surfaces must be cleaned, any
corrosion removed, and then primed prior to painting. Epoxy primers come in a
variety of colours. The most popular colours are green, yellow, and white. White
colours are much easier to cover with final topcoats. It is your choice. Zinc
chromate has been used for years as a primer. However, its popularity is
decreasing with the advent of epoxies. Zinc chromate should not be used if you
plan to apply polyurethane paint.
The elapsed time between priming and applying the topcoat will
vary depending upon the brand of paint used. Different manufacturers use varying
times. Usually, an epoxy primer should completely cure and harden prior to
applying the topcoat. That process takes several days depending upon the
temperature and humidity. Often, a full week is needed. The primer then needs to
be scuff sanded to obtain the needed adhesion for the topcoat.
Sanding
Proper sanding is a very important step in acquiring a high
quality finish. If you want a high gloss you will spend time sanding.
Sanding is usually accomplished using wet/dry sandpaper and water. The grit of
sandpaper used is dependent upon the surface and its roughness. Usually 180 grit
all the way to 600 grit or higher sandpaper is used. Sanding actually flattens
the surface of the object you are painting. It also removes any imperfections
that may be present such as small pieces of dirt. You should use a sanding block
when possible. Pneumatic orbital sanders can be used in larger areas. When
holding a piece of sandpaper in your hand, fold it in thirds to maximize the use
of the sandpaper. You can more efficiently use the paper this way. A straight
back and forth movement is preferred over a circular movement. Sanding 45
degrees one direction and then 45 degrees in the other direction works
well.
top coat paints
You have a choice of the type of topcoat paint along with a
large number of brand names. Enamel is a paint that is commonly used on aircraft
surfaces. These paints are sprayed over epoxy primer after being thinned to
proper consistency using enamel thinners. A light, mist coat is first sprayed on
and allowed to dry for a few minutes until it is tacky to the touch. This is
then followed by a full coat of enamel. One full coat may be sufficient or
another may be sprayed if desired. The use of enamel is not as popular as it was
in the past.
A second type of topcoat paint is acrylic lacquer. This paint
has a low solid content that makes it more difficult to apply. Acrylic lacquer
should be thinned using the proper thinner and then a very light tack coat
applied. An additional 4-5 cross coats of paint will then have to be applied
allowing about 30 minutes drying time between coats. (By the way, a cross-coat
is defined as moving the spray gun north and south followed by east and west:
one cross coat).
Polyurethane paint is probably the most popular choice for a
topcoat today. It is very durable and provides a high gloss finish. It is also
chemically resistant. These paints have a high solid content and they cure very
slowly which means they continue to flow out for a long period of time. This
flowing out process forms a very flat surface that gives the surface a high
gloss look. Polyurethane enamels are mixed with a catalyst prior to use. They
are then reduced to proper viscosity for spraying. A very light tack coat is
first applied followed by one or two full coats. One problem inherent in
polyurethanes is the thickness of the film applied. If the paint is applied too
thick it may tend to crack over a period of time. This is especially true when
applied over fabric. The fabric on an airplane will flex and move during flight.
This movement coupled with the thickness of polyurethane paint can present a
problem. Polyurethane paints designed for fabric airplanes are manufactured and
should be used when painting over polyester fabrics.
The one major problem encountered when using polyurethane
paints is its toxicity. Breathing the spray mist from polyurethanes may cause
severe sickness or even death. With this in mind, you must use a forced
air breathing system such as the HobbyAir system. You should also protect your
skin and eyes.
If you are painting a fabric airplane, you can use a specially
designed polyurethane topcoat, butyrate dope, or Poly-Tone. Butyrate dope and
Poly-Fiber's Poly-Tone are both very easy to apply because they are more
viscous. Therefore, they are less likely to run when applied.
No matter which paint you choose a few fundamentals apply.
First of all, the paint needs to be properly mixed. That means shaking the paint
on a paint shaker within one week of application. After shaking the paint it
should then be thoroughly stirred just prior to use. Secondly, the surfaces
should be wiped down with a paint cleaning solvent using a clean rag. Then a
tack rag should be used to remove any dust. Thirdly, the paint should be
properly thinned by following the manufacturers directions. A viscosity cup can
be used for the thinning procedure. These are small cups with a hole in the
bottom. The cup is filled with paint and then the viscosity is determined by the
amount of time, in seconds, required for the paint to flow through the hole
until it begins to drip. The next step is to strain the paint through a mesh
paint strainer. This should be done prior to placing the paint into the spray
cup. If you are using a polyurethane paint, you should strain the paint prior to
mixing the catalyst.
Mixing the catalyst in polyurethane paints should be done in
accordance with the directions from the manufacturer. Usually, you should let
the catalyst react with the base paint for at least 20 minutes prior to
spraying. Once you have mixed the paint you will have approximately 5 hours
before the chemical crosslinking begins and the mixture begins to thicken. With
that in mind, only mix the amount of paint you will need for the job. If you
mixed too much paint you can place it in a freezer (not with food) overnight,
remove it and allow it to reach room temperature before spraying. The cold
temperature delays the crosslinking process.
When applying the final colour coats, always be sure the paint
you are using has the same batch number. Slight differences in colour can often
be found in different batches of paint. One solution is to open all of the cans
of paint you will be using and mix them together in a large container. They can
then be poured back into the original containers after being mixed.
Other chemicals in addition to reducers that you may encounter
are retarders and accelerators. A paint retarder very simply is a solvent that
slows the drying time of the paint. It is added in proportion to the directions
on the paint can. Retarders are generally used in high temperature or high
humidity conditions. Accelerators have the opposite affect. They speed up the
drying time. Accelerators may be required to help the drying process in cool
temperatures.
painting process
The final preparation of the aircraft involves protecting every
component part that will not receive paint. This means the windshield, if
installed, needs to be protected. pitot tubes, static ports, tires, etc. must
all be covered. Be sure to use a good quality butcher paper to cover these
items. Do not use newspaper, the print will often come off onto your airplane's
surface. The painting equipment and the paint facility were discussed in detail
last month. A list of general tools and equipment is:
 Drop cloths to protect the floor. Drop cloths to protect the floor.
Plastic sheet
Coffee cans
Tack cloths
Paint filters
Stirring sticks
Masking tape
Fine-line masking tape
Butcher paper or masking paper
Clean rags
Wet/dry sandpaper
Sanding blocks
Scotch-brite pads
Orbital sander (optional)
Single edge razors
Plastic squeegee
Soup ladle for dipping paint
Scissors
Viscosity cup
Hand held agitator to use with pneumatic drill
Now let's discuss the actual process of painting. The most
important aspect of learning how to paint can be summarized in three words:
PRACTICE, PRACTICE, PRACTICE. Do not practice on your airplane. Get several
pieces of cardboard and learn how to properly set up the spray gun. Then
practice the spraying technique on the cardboard. Next, spray pieces of metal
lying flat on a surface. Then spray the metal pieces hanging vertically. When
you feel really confident, buy a piece of stovepipe or a large diameter pvc pipe
and paint it. Stand it vertically and paint the entire piece. When you can do
this without major mistakes you are ready to begin on your airplane. If
possible, always begin the painting process with a small control
surface.

FIGURE
1
This
illustrates the proper distance from spray gun to the
structure
The actual adjustment of a spray gun depends upon the equipment
you are using. The manufacturer should provide you with a set of instructions on
setting up the gun. You should use the type of spray gun nozzle recommended for
the type of paint you will be spraying. The gun should be properly adjusted each
time you spray. A test pattern should always be sprayed on a piece of cardboard
before beginning to paint. The normal pattern for a spray gun will be fan
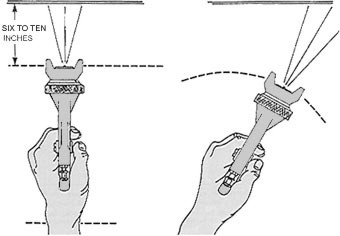
shaped. To begin the actual application procedure, hold the spray gun
approximately 8 inches from the surface you will be painting. Spreading your
fingers as illustrated in Figure 1 will usually approximate this distance. This
distance may vary somewhat depending upon whether you are using a HVLP system or
a pressure spray gun. The spray gun should be far enough away so the paint does
not run or sag when applied and close enough to lay on a wet coat. To prevent
the paint from being uneven, it is imperative that the gun be held exactly
perpendicular to the surface. If it is tilted the paint will be heavier on one
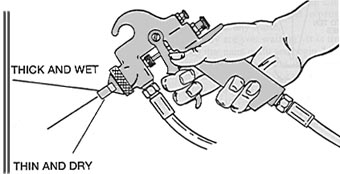
side and lighter on the other. See Figure 2. The spray gun should then be moved
parallel to the surface only the distance you can comfortably move your entire
arm while keeping the movement exactly parallel. See Figure 3. If the gun is
moved in an arc the material will be applied heavier in some places and lighter
in others. You should squeeze the trigger of the gun just prior to beginning the
paint stroke and release it just before it is completed. You then should move up
or down approximately fan width and begin the next pass. You must overlap the
passes to achieve an even build-up. Each pass of the gun will usually apply the
paint more thick in the middle with a tapering off on each end. Remember our
definition of a cross-coat, one pass north and south followed by a pass east and
west.
FIGURE
2
If the gun is
not held perpendicular to the surface, one side of the spray pattern will
be wet with a tendency to run, and the other side will be rough and
dry.
Proper lighting is absolutely essential when painting. For best
results try to position your lights 45 degrees to the surface being painted. By
looking into the glare of a light you will detect heavy and light areas of
material. Of course, heavy areas will often result in sags or runs. Paint the
edges of the structure first. Edges often do not receive an adequate amount of
paint. Painting them first will solve this problem. If at all possible, paint on
a flat surface. Of course, that is not always feasible. Paint will sag or run
much more easily on a vertical surface. Spraying in corners and around corners
presents a problem. Practice in areas such as this to establish the proper
technique. As a general rule, spray the corner first whether it is inside or
outside then you can blend the paint in with subsequent strokes.
As I mentioned last month, it is much easier to paint your
airplane prior to assembling it. Practically speaking many builders will
assemble their airplane, test fly it, and then paint it. If you do paint your
airplane while it is in one piece there is a definite sequence you should
follow. First of all, you will want to paint ends and leading edges of surfaces.
Paint the bottom of the airplane first by beginning at the tail. Spray from the
tail control surfaces all the way up the fuselage to the engine then spray the
underneath side of the wings. It is much easier if you can persuade another
painter to help you. That person can paint at the same time you are painting
with one of you staying slightly ahead of the other. Often it is impossible for
one person to reach entirely across a wing. The trick of the entire process is
to keep the surface wet all the time.
After spraying the underneath side of the airplane you then
should spray the vertical stabilizer, the top of the tail surfaces, the top of
the fuselage, and then the top of the wings. It is more difficult to paint the
airplane when it is assembled. Overspray is the problem. You must keep overspray
off the surfaces you have finished. I would recommend visiting a local paint
shop and watching their techniques. There are a number of ways to do this and
each painter has a trick or technique. When you paint the airplane unassembled
the problems are minimized.
As a rule of thumb, a white coat of paint should be applied
prior to final colours. This will provide better coverage with less material and
also bring out a more brilliant colour in the final coats. White primer will
serve this purpose. Do not try to cover red paint with a lighter colour. Red
should always be the last coat sprayed.
FIGURE
3
The paint
spray gun must be moved parallel to the surface. If the gun is moved in an
arc, the spray pattern will be thick in some spots and thin in
others.
Once you have completed the base colour you will then be ready
for the trim colours. A sufficient amount of drying time should be allowed once
again according to the manufacturer's recommendation. Usually at least 12 hours
is needed. Some poly urethane manufacturers direct users to wait at least one
week until the paint is more fully cured. After one week the area to be painted
should be lightly sanded to provide tooth adhesion. Use the best grade of
masking tape available. I would recommend 3M's fine line tape that is designed
for trim use. Remember, do not use newspaper to cover areas only good Kraft
paper. Apply the tapes and then use a small plastic squeegee to press down the
edges of the tapes just prior to spraying. Pull the tapes off when the paint
dries to the touch, usually 1-2 hours. When pulling the tapes off pull toward
the new paint. Do not leave the tape on for a long period of time.
You will encounter problems. Runs and sags are perhaps the most
common. These usually form as the result of improper spraying techniques, such
as the gun too close to the surface, or the material is too thin. When you
create a run or sags simply stop and let the paint dry. If it is a polyurethane
you should let it dry several days. Then go back and sand out the run or sag and
respray the area. An orange peel look is also a common problem. That usually
results from the air pressure being too high in a pressure gun, the paint too
viscous, or improper solvent. Blistering of the paint is a result of the surface
not being properly primed or moisture being present on the surface. A coarse
finish is another problem that occurs because the surface was not thoroughly
cleaned.
The final step is the one everyone dislikes: clean-up. If you
are going to preserve your spray gun you must clean it thoroughly. This means
taking the gun apart and cleaning it with a solvent, either reducer or MEK.
Remember, protect your hands from any solvent. After a complete cleaning some
painters will actually leave the nozzle of the gun in a solvent until the next
job. You also want to properly dispose of any waste.
Why are you waiting? It is time to buy that paint outfit and
begin. I believe with proper equipment, a modest facility, and a lot of practice
you can apply a high quality finish on your airplane.
|
