|

aircraft
hardware
By Ron Alexander
The quality of our workmanship in building an airplane is very
important. We all take the needed time and spend the necessary money to ensure
we have a high quality airplane. We want it to not only look attractive, but
also to be safe. But what about the materials that hold the airplane together
the aircraft hardware? Do we try to cut expenses by using questionable bolts or
used nuts? Is it really necessary to spend money on high quality aircraft
hardware? Absolutely! The hardware used to assemble your airplane should
be nothing but the best. Why take the time to build a perfect wing only to
attach it to the fuselage with used hardware. It makes no sense. To quote the
Airframe and Powerplant Mechanics General Handbook . . . "The importance of
aircraft hardware is often overlooked because of its small size; however, the
safe and efficient operation of any aircraft is greatly dependent upon the
correct selection and use of aircraft hardware." Very well stated. The same book
also provides us with a very good definition of aircraft hardware. "Aircraft
hardware is the term used to describe the various types of fasteners and
miscellaneous small items used in the manufacture and repair of
aircraft."
The subject of aircraft hardware can certainly be confusing.
Thousands upon thousands of small items are used on a typical airplane. What
does the custom aircraft builder really need to know about hardware? Where do
you find the information? What reference is really the end authority on proper
installation? What do all of those AN numbers mean and do I have to know them?
What types of hardware should I really learn more about in order to build my own
airplane?
These questions will be answered in this series of articles on
aircraft hardware. I hope to eliminate some confusion over what type of hardware
to use and how to properly install it. To begin our discussion, it is absolutely
imperative that you use nothing but aircraft grade hardware. Commercial grade
hardware found in hardware or automotive stores is legal to use on an
experimental airplane but should not be considered for even a
moment. Why? Let's look at bolts as an example. Common steel bolts purchased
from a hardware store are made of low carbon steel that has a low tensile
strength usually in the neighbourhood of 50,000 to 60,000 psi. They also bend
easily and have little corrosion protection. In contrast, aircraft bolts are
made from corrosion resistant steel and are heat treated to a strength in excess
of 125,000 psi. The same comparison applies to most hardware items. So, use
only aircraft quality hardware on your airplane. Save the other hardware for
your tractor.
If aircraft hardware is special, then there must be a standard
against which it should be measured and manufactured. That standard was actually
developed prior to World War 11, but became more definitive during that war.
Each branch of the military originally had its own standard for hardware. As
time went on these standards were consolidated and thus the term AN which means
Air Force-Navy (some prefer the older term Army-Navy). Later the standards were
termed MS which means Military Standard and NAS which means National Aerospace
Standards. Thus, the common terms AN, MS and NAS. Together they present a
universally accepted method of identification and standards for aircraft
hardware. All fasteners are identified with a specification number and a series
of letters and dashes identifying their size, type of material, etc. This system
presents a relatively simple method of identifying and cataloging the thousands
and thousands of pieces of hardware. Several pieces of hardware will have both
an AN number and an MS number that are used interchangeably to identify the
exact same piece. A cross reference exists that compares these two numbers. So
in the end, you are able to read your plans or assembly manual and identify, by
number and letter, each piece of hardware on your airplane. You can then obtain
that piece and properly install it in the right place. Imagine trying to do that
without a system of numbers. The specifications for each piece of hardware also
define the strength, tolerance, dimensions, and finish that is applied. If you
would like further information on this numbering system, you can contact the
National Standards Association in Washington, DC.
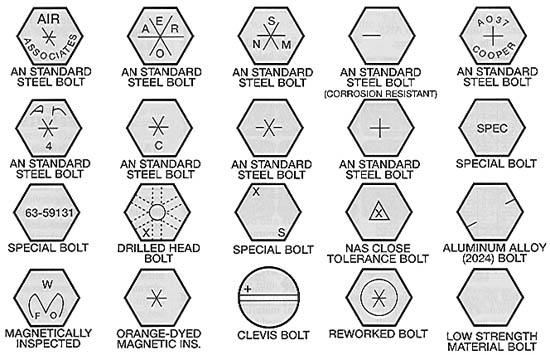
FIGURE
1
Out of all the thousands of hardware pieces manufactured, which
ones are important to the custom aircraft builder? The following types and
categories of hardware will be discussed:
-
Bolts
-
Nuts
-
Washers
-
Screws
-
Cotter pins and safety wire
-
Rivets
-
Turnlock fasteners
-
Miscellaneous items such as 0-rings, crush washers,
etc.
-
Control cable hardware
-
Fluid lines and fittings
-
Electrical wiring and connectors
Where do you find information concerning aircraft hardware?
Your aircraft plans or assembly manual should provide you with a general
overview of hardware used on your project. Use the hardware the aircraft
designer or kit manufacturer recommends. Do not substitute with your own ideas.
This can be dangerous. The manufacturer has tested the design and its safety is
dependent upon the proper pieces of hardware. FAA Advisory Circular 43-13-IA is
an excellent reference source. The Airframe Mechanics General
Handbook also has a very good section on the selection and use of hardware.
These two books are considered the primary authority on the proper use of
hardware. In addition, I would recommend two other small reference books: the
Standard Aircraft Handbook and the Aviation Mechanic Handbook.
Both of these provide a good reference source. The Aircraft Spruce &
Specialty catalog also contains good reference material on hardware. If you have
any doubts about the quality of the aircraft hardware you are purchasing,
request a copy of the manufacturer's specifications. These specifications along
with a specific manufacturer's lot number should be available.
bolts
Bolts are used in aircraft construction in areas where high
strength is needed. Where this strength is not necessary screws are substituted.
Aircraft quality bolts are made from alloy steel, stainless or corrosion
resistant steel, aluminium alloys and titanium. Within our industry the first two
are the most common. Aircraft bolts will always have a marking on their head. If
you see no markings at all on the head of a bolt, do not use it. It is probably
a commercial grade bolt. The markings on bolts vary according to the
manufacturer. You should see an "X" or an asterisk along with a name, etc. If
you purchase a corrosion resistant (stainless steel) bolt, the head of that bolt
should have one raised dash. An aluminium bolt will have two raised dashes on its
head. Aluminium bolts have limited use. They should not be used in tension
applications or where they will be continuously removed for maintenance or
inspection. A chart of typical bolt heads is presented in Figure 1. NAS bolts
have a higher tensile strength (usually about 160,000 psi) and can be identified
by a cupped out head. Close tolerance bolts are machined more accurately than
general purpose bolts and they are used in applications requiring a very tight
fit. Close tolerance bolts can be either AN or NAS and typically have a head
marking consisting of a raised or recessed triangle.
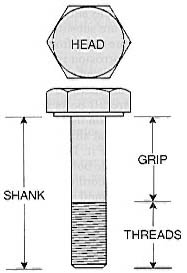
The standard bolts used in aircraft construction are AN3
through AN20. Each bolt typically has a hexagon shaped head and a shank that
fits into the hole. The shank is threaded on the end and the unthreaded
portion of the bolt is termed the grip. The diameter of a bolt is the
width of the grip. The shank of a bolt will be either drilled to accept a cotter
pin or undrilled. Another option is to purchase a bolt that has the head drilled
for the purpose of accepting safety wire. Clevis bolts are manufactured with a
slotted head and are used for control cable applications. The size, material,
etc. of a bolt is identified by an AN number. A breakdown of a typical bolt AN
number follows:
AN4-8A
-
AN means the bolt is manufactured according to Air
Force-Navy specs.
-
4 identifies the diameter of the bolt shank in 1/16"
increments
-
8 identifies the length of the shank in 1/8"
increments
-
A means the shank of the bolt is undrilled (no letter here
means a drilled shank)
So, this particular bolt is a 1/4 inch diameter AN bolt that is
1/2 inch long measured from just under the head to the tip of the shank. The
bolt also has an undrilled shank which means it cannot accept a cotter pin.
Also, bolt length may vary by +1/32" to -1/64". If the letter "C" follows the AN
designation (ANC) that identifies a stainless steel bolt. The letter "H" after
AN (ANH) identifies a drilled head bolt.
FIGURE 2: AN Aircraft Bolt Dimensions
(opens in new window)
In constructing you airplane, you will not encounter many bolts
larger than an AN8 (1/2 inch diameter). To add a bit more confusion, if the dash
number defining the length of the bolt has two digits, the first digit is the
length in whole inches and the second number the length in additional 1/8"
increments. In other words, an AN514 bolt would be I- 1/2 inches
long.
Now that you are totally confused let me recommend a hand tool
to simplify bolt selection and sizing. An AN bolt gauge is available that will
assist you in identifying a bolt (click on the above link to Figure
2).
If you need to determine the proper size of a bolt, the length
must be sufficient to ensure no more than one thread will be inside the bolt
hole. This is the grip length of the bolt and it is measured from the
underneath portion of the head to the beginning of the threads (see Figure 3
below). The grip length should be equal to the material thickness that is being
held by the bolt or slightly longer. A washer may be used if the bolt is
slightly longer. A piece of welding rod or safety wire can be used to measure
the length of the hole. In his book titled Sportplane Construction
Techniques, Tony Bingelis shows a simple tool that can be made for this
purpose.
FIGURE
3
It is important that you do not "over tighten" or "under
tighten" a bolt or the nut attached to a bolt. Under torque or under tightening
results in excessive wear of the hardware as well as the parts being held. Over
tightening may cause too much stress on the bolt or nut. The best way to avoid
this is to use a torque wrench. AC43-13 presents a table of torque values for
nuts and bolts. It shows fine thread and coarse thread series with a minimum and
maximum torque limit in inch pounds. I recommend using a torque wrench whenever
possible, at least until you get an idea as to the amount of force required. Of
course, critical installations should definitely be torqued to proper values. A
torque wrench is not that expensive and will be a worthwhile investment for a
custom builder.
Basics of Bolt Installation
Certain accepted practices prevail concerning the installation
of hardware. A few of these regarding bolt installation follow:
-
In determining proper bolt length - no more than one thread
should be hidden inside the bolt hole.
-
Whenever possible, bolts should be installed pointing aft
and to the centre of an airplane.
-
Use a torque wrench whenever possible and determine torque
values based on the size of bolt.
-
Be sure bolt and nut threads are clean and dry.
-
Use smooth, even pulls when tightening.
-
Tighten the nut first - whenever possible.
-
A typical installation includes a bolt, one washer and a
nut.
-
If the bolt is too long, a maximum of three washers may be
used.
-
If more than three threads are protruding from the nut, the
bolt may be too long and could be bottoming out on the shank.
-
Use undrilled bolts with fibre lock nuts. If you use a
drilled bolt and fibre nut combination, be sure no burrs exist on the drilled
hole that will cut the fibre.
-
If the bolt does not fit snugly consider the use of a close
tolerance bolt.
-
Don't make a practice of cutting off a bolt that is too long
to fit a hole. That can often weaken the bolt and allow corrosion in the area
that is cut.
aircraft nuts
Aircraft nuts usually have no identification on them but they
are made from the same material as bolts. Due to the vibration of aircraft, nuts
must have some form of a locking device to keep them in place. The most common
ways of locking are cotter pins used in castle nuts, fibre inserts, lockwashers,
and safety wire. The aircraft nuts you will most likely encounter are castle
nuts, self-locking nuts, and plain nuts. Wing nuts and anchor nuts are also
used.
Castle Nuts
AN310 and AN320 castle nuts are the most commonly used (see
Figure 4). Castle nuts are fabricated from steel and are cadmium plated.
Corrosion resistant castle nuts are also manufactured (AN310C and AC320C -
remember, when you encounter a "C" it will designate stainless). Castle nuts are
used with drilled shank bolts, clevis bolts and eye bolts. The slots in the nut
accommodate a cotter pin for safetying purposes. The thinner AN320 castellated
shear nut has half the tensile strength of the AN310 and is used with clevis
bolts which are subject to shear stress only. The dash number following the
AN310 or AN320 indicates the size bolt that the nut fits. In other words, an
AN310-4 would fit a 1/4 inch bolt.
FIGURE 4
Self-Locking Nuts
Self-locking nuts, as the name implies, do not need a locking
device. The most common method of locking is derived from a fibre insert. This
insert has a smaller diameter than the nut itself so that when a bolt enters the
nut it taps into the fibre insert producing a locking action. This fibre insert
is temperature limited to 250-deg. F. The designation of these nuts is AN365 and
AN364. This brings us to an example of a cross-reference MS number. An AN365 is
also termed MS20365 with the AN364 being MS20364. Both of these nuts are
available in stainless. The AN364 is a shear nut not to be used in
tension.
An all metal locking nut is used forward of the firewall and in
other high temperature areas. In place of a fibre insert, the threads of a metal
locking nut narrow slightly at one end to provide more friction. An AN363 is an
example of this type of nut. It is capable of withstanding temperatures to
550-deg. F.
The dash number following self-locking nut defines the thread
size. Self-locking nuts are very popular and easy to use. They should be used on
undrilled bolts. They may be used on drilled bolts if you check the hole for
burrs that would damage the fibre. One disadvantage, self-locking nuts should
not be used on a bolt that is connecting a moving part. Am example might be a
clevis bolt used in a control cable application.
Plain Aircraft Nuts
Plain nuts require a locking device such as a check nut or
lockwasher. They are not widely used in most aircraft. AN315 is the designation
used for a plain hex nut. These nuts are also manufactured with a right hand
thread and a left hand thread. The check nut used to hold a plain nut in place
is an AN316. If a lockwasher is used a plain washer must be under the lockwasher
to prevent damage to the surface.
Other Aircraft Nuts
There are a number of other aircraft nuts available. Wing nuts
(AN350) are commonly used on battery connections or hose clamps where proper
tightness can be obtained by hand. Anchor nuts are widely used in areas where it
is difficult to access a nut. Tinnerman nuts, instrument mounting nuts, pal
nuts, cap nuts, etc. are all examples of other types that are used.
Basics of Aircraft Nut Installation
-
When using a castle nut, the cotter pin hole may not line up
with the slots on the nut. The Mechanics General Handbook states
"except in cases of highly stressed engine parts, the nut may be over
tightened to permit lining up the next slot with the cotter pin hole." Common
sense should prevail. Do not over tighten to an extreme, instead, remove the
nut and use a different washer and then try to line the holes again.
-
A fiber nut may be reused if you are unable to tighten by
hand.
-
At least one thread should be projecting past the
fibre on a
fibre nut installation.
-
No self-locking nuts on moving part installations.
-
Do not use AN364 or AN365
fibre nuts in areas of high
temperature - above 250' F.
-
Shear nuts are to be used only in shear loads (not
tension).
-
Plain nuts require a locking device such as a lockwasher or
a check nut.
-
When using a lockwasher, place a plain washer between the
surface of the airplane part and the lockwasher.
-
Shear nuts and standard nuts have different torque
values.
-
Use wing nuts only where hand tightness is adequate.
washers
Finally, a hardware item that is simple. You are likely to
encounter only a couple of different types of washers AN960 and AN970. The main
purposes of a washer in aircraft installation are to provide a shim when needed,
act as a smooth load bearing surface, and to adjust the position of castle nuts
in relation to the drilled hole in a bolt. Also, remember that plain washers are
used under a lockwasher to prevent damage to a surface.
AN960 washers are the most common. They are manufactured in a
regular thickness and a thinner thickness (one half the thickness of regular).
The dash number following the AN960 indicates the size bolt for which they are
used. The system is different from others we have encountered. As an example, an
AN960-616 is used with a 3/8" bolt. Yet another numbering system. If you see "L"
after the dash number, that means it is a thin or "light" washer. An AN960C
would be - yes, a stainless washer. I can tell you are getting more familiar
with the system so I will throw another wrench into the equation - an AN970
washer has a totally different dash number system. I am not even going to tell
you what it is. I will tell you that an AN970 is a larger area flat washer used
mainly for wood applications. The wider surface area protects the
wood.
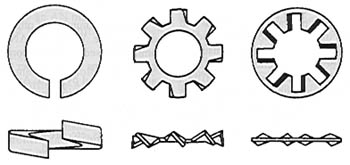
There are other types of washers. I mentioned lockwashers that
are made several different ways. They are often split ring, they are sometimes
internal tooth and even external tooth (see Figure 5). You will also find nylon
washers and finishing washers that usually have a countersunk head. So, as you
can see, washers are not quite as confusing as other hardware even though we can
make ft difficult if we wish.
FIGURE
5
cotter pins and safety wire
The cotter pins mostly used on custom aircraft are AN380 and
AN381. Cadmium plated cotter pins are AN380 and stainless are AN381. Cotter pins
are used for safety bolts, screws, nuts and other pins. You will normally use
them with castle nuts. The MS number you may see is MS24665. The dash numbers
indicate diameter and length of the pin. As an example, AN380-2-2 would be a
cadmium plated pin 1/16" in diameter and 1/2" long. All supply companies will
have charts showing the various sizes versus the reference number.
Safety wire is also widely used. The most used sizes in
diameter are .020, .032 and .041 or small variations thereof. The material is
usually stainless steel or brass. The easiest method of installation is acquired
by using safety wire pliers (see Figure 6). The pliers are used to twist the
wire. The wire is installed so that if the nut or bolt begins to loosen it will
increase the tension on the wire. Be sure you do not over-twist the wire - doing
so will weaken the safety wire. Leave about 36 twists and then cut off the
excess wire and bend its end so you do not snag it with your hand at a later
time.
|
